
Yeah, you got me right. I mean, it’s not a real ‘Iceland photo tour’ because I’m talking here about a self-guided kind of thing. And when it comes to it, it’s not ‘free’ either. You’ll need to get to Iceland first, get a car, a warm place to stay… Right, that should do as a disclaimer. Difficult times, you can’t say a thing without a crazy person from the internet taking every your word literally.
With that sorted out, let’s better give the post the following catchy name.
Table of Contents
Disclosure
Free itinerary, tips and tricks for photographing Snaefellsness peninsula (which is in West Iceland) and Vík (which is rather in South Iceland) on your own. In April.
About this part of Iceland
I like to split West Iceland into two main regions of interest, the Snaefellsness peninsula, and the Westfjords. Not exactly correct but OK for the purpose of this article.
Westfjords are very remote and mostly gravel-road connected. The distances on a map are misleading because, well, it’s fjords, so you collect many many kilometers in a very zig-zaggy way. And on top of the cake – quite some roads are not exactly in their best shape during winter and spring. The reward? Pure, remote Iceland. And puffins.
On the other hand, getting to the Snaefellsness peninsula is a piece of lava cake. Snaefellsness is quite popular among photographers but sometimes forgotten by “normal tourists”. I believe the reason is simple – it’s not on the Ring Road No. 1. Many people are not informed about the roads in Iceland or get terrified by rental car agents. But let me get this straight – all the main roads on the peninsula are as smooth as the plumage of a baby puffin (expect more puffin jokes in this article). Nevertheless, the recent years of promoting West Iceland brought results and the united travelers of the world now officially have it on the radar.
It stayed on my radar since summer 2015, when I was there with my wife and saw almost nothing at all, except fog, heavy rain and the brutal power of Icelandic weather. So why not try my luck again in 2018 and focus only on photography?
I also added a facultative trip in direction Vik, which is rather South Iceland and a separate chapter. However, it fits very well to the character of this particular trip.
When to go and why April is a good month
Here comes the best thing – any time of the year is generally good for Iceland! Your decision shouldn’t be only a weather question since it changes so fast and frequently anyway. It’s rather a question of daytime and if you come to take pictures, a question of light. Check out this website before taking a decision.
You may also want to consider this simple equation:

Subscribe now and get my free ebook straight into your mailbox!
Number of tourists in summer > Number of tourists in winter
I chose April for my photo tour. It may sound random but I did my research first. From the temperature perspective, you can get anything between 0 and 10 degrees (Celsius). Which is exactly what I got. One day was even like 14 degrees which for Icelanders represents hardcore summer temperature. Mornings were almost freezing though. Wind was OK in the beginning, it got a bit out of control towards the end of my trip.
Another advantage of April is that the nights are still dark, hence you may be lucky and still see the northern lights! Without freezing to death while waiting! Yay! During my trip, unfortunately, the solar activity was very low. I checked every night anyway!
The deal-breaking factor for me was the getting-up-early factor. In April the best morning light for a shooting is let’s say between 5:30 and 7 a.m. It is early, taking into account that you’ll need to get up, eat, have a coffee, drive for some time, have another coffee and walk somewhere. But just a few weeks later, and you’d have to get up at like 3 a.m. A few weeks earlier, when the sun pops up later, groups of crazy selfie people do as well. April for president.
What to drive in April for this tour
A small 2WD car is totally enough. I chose a VW Polo and was fine throughout the journey. I don’t remember any steep hills or hardcore gravel, for which it wouldn’t be sufficient. There were only a few moments when I wished to have a 4WD. Weirdly, most of these moments occurred at parking areas. And don’t forget that SUVs are not really 4WDs. Renting a city SUV car seems to me like a complete waste of money.
What to wear in April for this tour
‘Waterproof’ is the keyword! Shoes, trousers, jacket, hat, and gloves – make sure all is waterproof. I don’t think you need a hardcore winter jacket but you’ll certainly need a couple of layers to put on and off. As it was very windy and I don’t really wear hair, I was happy to be a lucky owner of this funny hat. Overkill? Maybe, I totally got some questioning looks. But you know what? I was warm and well-protected from the weather. Unlike many others.
The Money question
You have probably heard that already. Don’t even spend your time changing money or looking for an ATM. You can pay for literally everything by card, including parking at Seljalandfoss, tiny little espresso or even for the use of a toilet. Iceland is probably the most impressive country in terms of cashlessness. If that’s a word.
And yeah, the prices in Iceland are as high as puffins’ ambition to swim well – very high (I warned you). If you don’t go to restaurants every day, you can do this trip on a good budget. Supermarkets are payable! (I wouldn’t say affordable). Because I traveled solo, I stayed in cheap hotels and hostels (40-60 EUR per night) and I can’t complain. I was upgraded twice for a better room and I slept twice in a 12-bed dormitory with 11 empty beds.
The detailed Photo Tour Itinerary
Among my friends, I’m known for detail planning of my travels. So of course, there is a map:
DAY 1 – Arrival, Hvalfjördur and Borgarnes
- Keflavik Airport – get cracking direction Reykjavik; depending on your schedule and whether or not you’ve been there before, visit Reykjavik or skip it.
- Drive around the Hvalfjördur fjord (optional) – don’t forget to turn right onto road no. 47 if you want to do it; I personally like the fjord as it’s calm, pretty and if you have the time, you may visit Glymur, Iceland’s second highest waterfall (you’ll need a couple of hours for this adventurous hike)
- Borgarnes – good place to stay overnight with enough of affordable accommodation and two supermarkets (Bonus, Netto), another option I can recommend is the Ensku Husin guesthouse
- I didn’t plan any shooting for the first day nor did I drive to Reykjavik city as I didn’t have sooo much time before the night fell. What I recommend is going for a sunset walk around Borgarnes, which is marked as “Romantic walk of Borgarnes”. It leads you around a little hill with a sculpture on it, the sea bank with pretty views and then it gets a bit awkward as you go through a creepy scrap yard and end up in a small cozy car park. Icelanders – they know how to impress a woman.

DAY 2 – Budakirkja, Arnarstapi and Londrangar
- Get on the road as soon as possible (it is ca 1h 20 min drive to Budakirkja), that gives you a good chance to arrive among the first ones and get good morning light. Between Borgarnes and Eldborg, there are many spectacular “road views” opening up, if you leave very very early, it is quite safe to hop out of your car for a second and take a shot. Please be extremely careful when parking (never park on the road!) and walking on the road.
Photography tips: You will nail it with a 16-35 mm lens and a your tripod very low
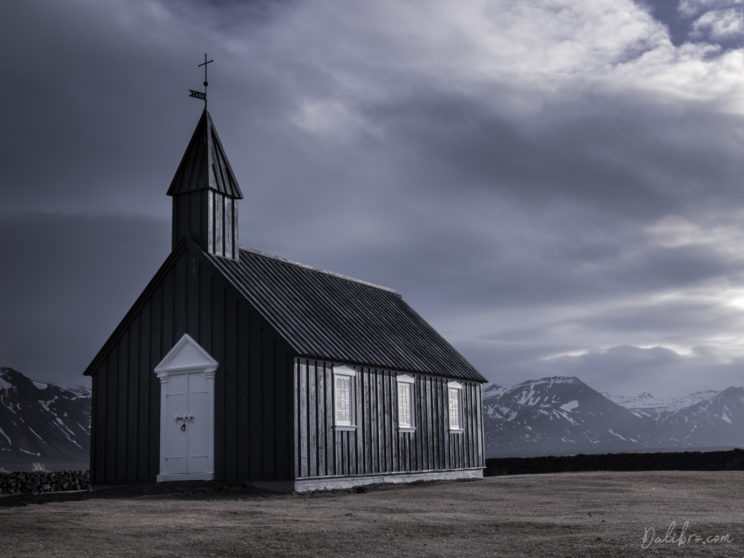
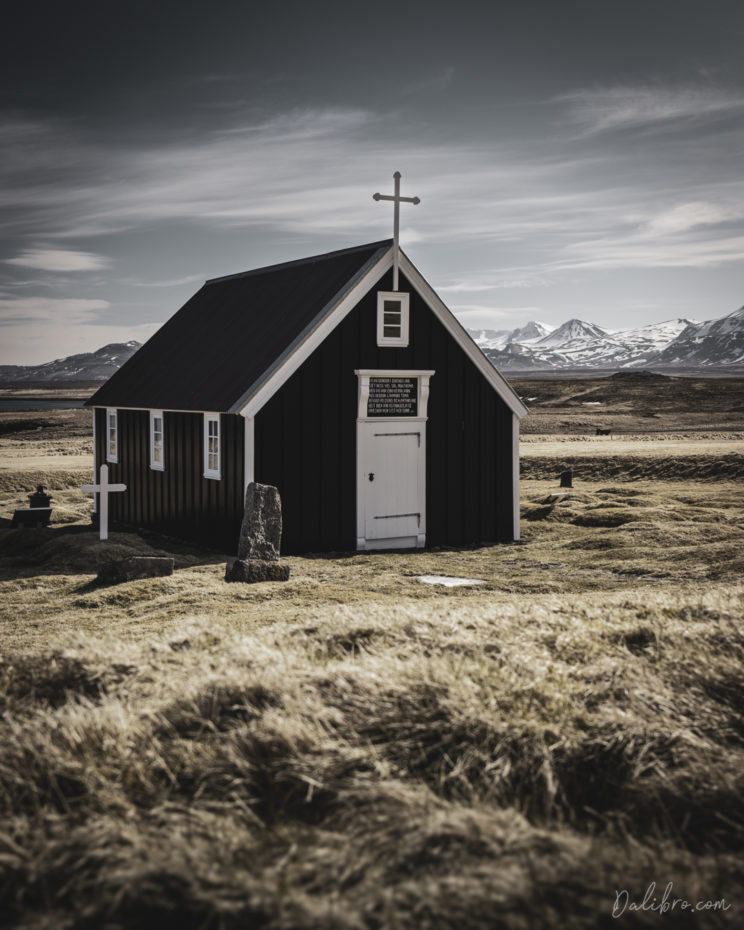
- Budakirkja (Budir) will at some point pop up on your left side. Quite hard to miss when you’re looking for a moody black church in the middle of a lava field. However, it is not impossible to miss the turn. You’ll first need to turn left, direction Arnarstapi and then left again, direction Budir (it doesn’t explicitly says “Budakirkja”). If you get there early, trust me, you’ll get rewarded.
Photography tips: There are many perspectives of the church to work with. Don’t ignore the lava/yellow grass field behind the parking area. That will give you the black church on the mountain background while the yellow grass nicely covers the parking area and most of the tarmac. Lens between 16 and 50 mm will do. A wide lens will be your advantage, especially if more tourists show up (you can still eliminate them by standing right at the front gate). If you go for the short hike behind the church, you may want to zoom a bit. Tripod will be definitely useful to keep your ISO low.
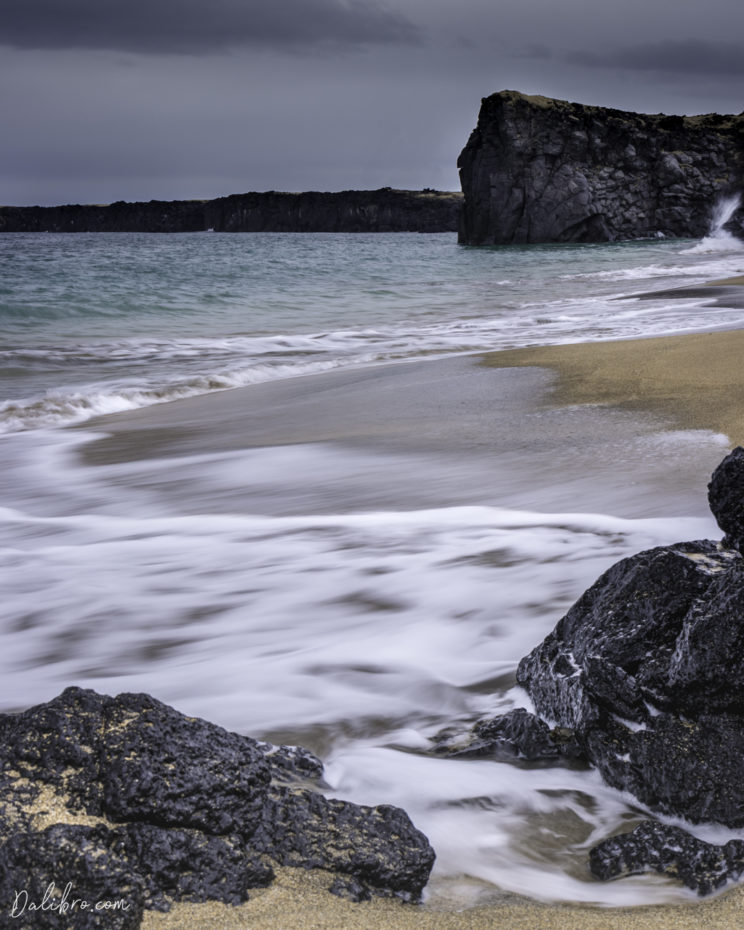
- Arnarstapi walk – if following this itinerary, you should arrive at Arnarstapi still quite early so the harbor parking at the very end of the village should be still available – simply drive through the village as far as you can get. Then park, otherwise you’ll end up in the ocean. There is a beautiful well maintained path around the coastline which goes up to Hellnar, the neighboring village (you don’t need to go that far though). On the way, there are some points of interest marked by a sign – one of the first stops is Gatklettur, an impressive rock gate in the sea. Second stop – phenomenal lightly-curved basalt cliffs that have some really hard time being beaten by the waves.
Photography tips: There is a small viewing platform at the cliff point. The view to the left is well-known but I really enjoyed the view to the right, too! I totally recommend bringing a tripod and some ND filters to experiment with the shutter speed. Longer exposures will emphasize the dynamics of the waves!
")
- Londrangar – Londrangar is a rock at the sea, accessible from two sides. The first parking is visible directly from the road, has a no-barrier access and everyone stops there or at least attempts to do so. The other one is much less occupied. There is a turn to your left marked as “Information”, which appears quite suddenly after about a kilometer further direction Olafsvik. You’ll drive a bit down to the sea, direction lighthouse. This place has toilets and an information center. And the lighthouse, which surprisingly became the main point of my photography interest. You may go for a hike to the actual rock from there, it takes about 20 minutes one way.
Photography tips: If you’re following this itinerary step by step, you’ll probably be at Londrangar in the early afternoon. Not the best time for landscapes on an average day. Nevertheless, Londrangar is home for many many flying creatures, some call them birds. So definitely bring a long lens, if that sounds interesting to you. I even saw one lonely seal in the ocean. Or maybe it was a duck. I’m not great at recognizing animals from a distance.

- If possible, staying at West Park Guesthouse at the very tip of the Snaefellsness peninsula and actually inside the Snaefellsness National Park. No luxury but surprisingly affordable, clean, very friendly staff and strategic location. Just plan well because the check-in is only possible 3 to 6 p.m.

- After check-in (so that you avoid the time pressure), you may go and explore the Skardsvik beach nearby. It’s a pretty white sand beach – quite a rarity in Iceland. Still not very known and not very photographed, secret tip! It has a bit of a tropical touch which looks really interesting. You can get there quite easily on a narrow paved road. If feeling adventurous and/or having a 4WD, you can drive from there further to the orange Svörtuloft lighthouse. It is another dramatic landmark in the area but the road looks really bumpy (according to the Internet, you can drive there in a 2WD, I was just not in the mood for troubles in this remote place with the night falling down on my head).
DAY 3 – Kirkjufell, Grundarfoss, Stykkisholmur
- Again, get up early so that you don’t miss the good light and lack of people at Kirkjufell, which is naturally the highlight of the day
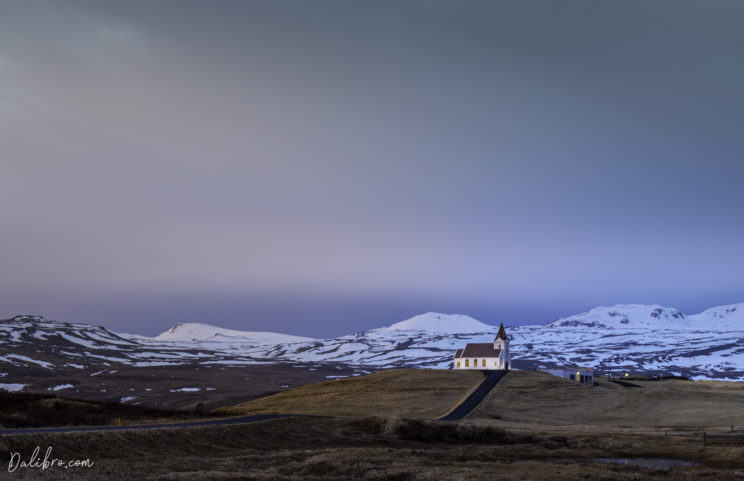
- Ingjaldsholskirkja – lovely white church with a catchy name and a backdrop made of impressive mountains. It is pretty much on the way to Kirkjufell (took me maybe 15 extra minutes to get there, look around and take 2 photos – time well spent).
Photography tips: Personally, I liked the most the view right next to the road leading to the church (a bit less tarmac on the final picture). Sunset would be probably a bit better than sunrise but hey, we work with what we have.
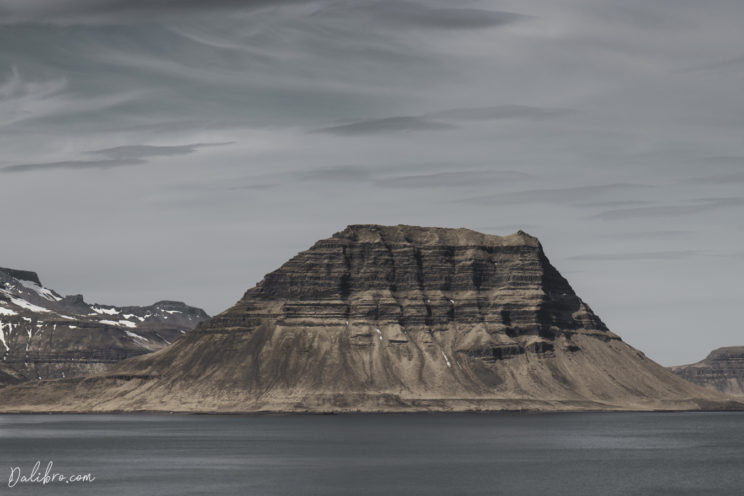
- Kirkjufell – probably the most photographed mountain in Iceland. Everybody has seen the photo. Arriving early guarantees you a parking spot and no chaos. What I really like about Kirkjufell is how it transforms as you drive towards it. And then, suddenly, tadaaa – there it is! Like on my photo below 🙂
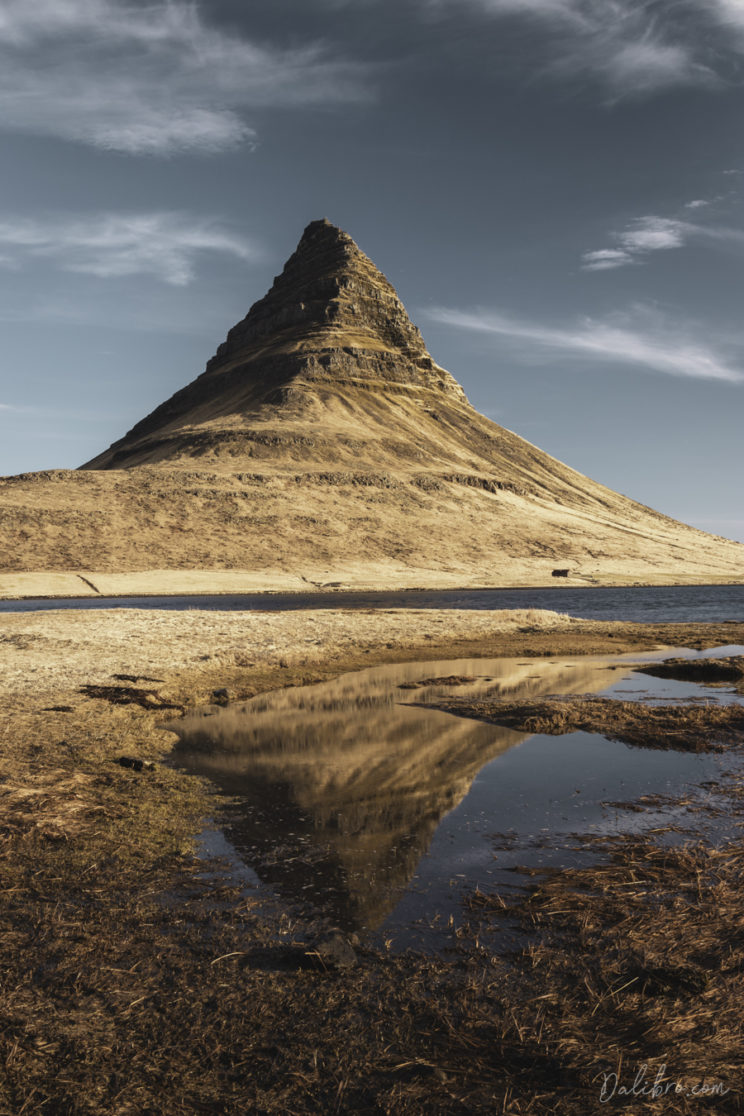
Photography tip I : A beautiful cone-shaped mountain and even a waterfall! Can’t be difficult to take a picture, right? BUT it’s not that simple once you’re there. You only see the entire waterfall when you’re standing very close to it. And at that moment, Kirkjufell seems like the biggest mountain in the world way too far to the right. So if your lens is as wide as the feeling range of a Viking (= not very wide), you’ll get frustrated in no time. My camera has a cropped sensor and the widest lens I had was 24mm. Which was totally not enough. My estimate is that the absolute minimum for the famous shot is 24mm on a full-frame camera or 18mm on a cropped sensor. Another option would be to level your tripod, take 2 or 3 shots and then combine them into a panorama in Photoshop or Lightroom.
Photography tip II : – do the full round!!! In my experience, most people just walk up to the waterfall Seljalandsfoss and then go back. Big mistake! After you enjoy the famous view, go back up to the bridge and turn left. There is an old road going around the lagoon. It provides less explored perspectives of the mountain and helps eliminate other people from your photo. Especially the view over the lagoon is simply stunning. If you’re lucky and there is no wind, you’ll see the entire beauty twice – once in real and once mirroring in the lagoon (like the title image). When you get back on the main road, be careful. Walk down to the bridge and you’ll see a tiny beach on your right, next to the road. That is another less known spot, which is actually pretty cool. I drew a small map of the mini-trekking route:

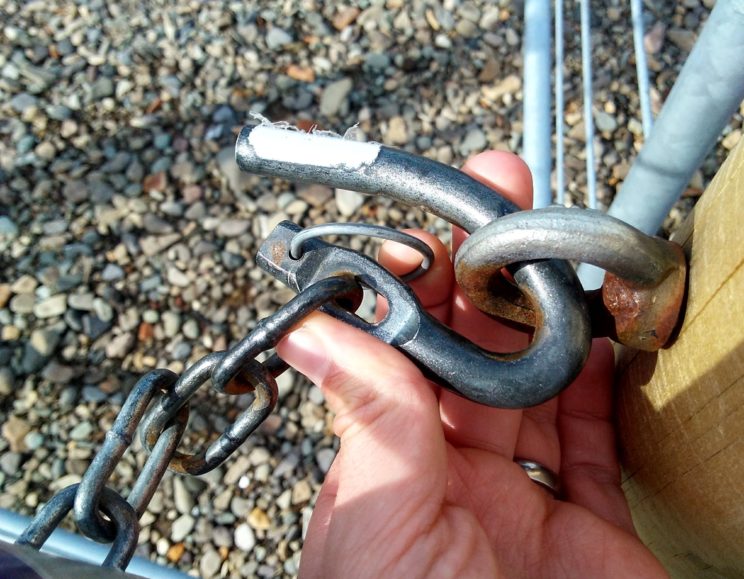
- Grundarfoss – is a less-known waterfall with the ultimate anti-tourist protection – a closed gate. Don’t be discouraged! I saw several cars arriving to the parking lot, stepping up and down nervously for a while and then leaving. The trouble is the way to Grundarfoss lies in a source-water protection area. Hence the gate. But you are allowed to walk there, just follow the instructions on the signs. You’ll be able to get quite close to the waterfall when another fence appears. If you want to continue and get even closer, you’ll need to cross the stream. The stream was about 30cm (12 inches) deep. That was in the time of melting snow, though. Here’s a picture of the main gate and how to open it, you may see the waterfall in the background:

- Bjarnarhöfn – most people come here to visit the Shark museum. However, there is a another pretty black-as-a-puffin church. Behind it ocean and mountains. I felt like this one was a bit more difficult to photograph as there were some distractions lying around.
- Stykkisholmur – is another great place to stay overnight. There is a little basalt island connected with a bridge where you can climb up to check out the lighthouse and the cliffs. It has also some very good restaurants (I can highly recommend Sjavarpakkhusid and my favourite Narfeyrarstofa). Parking is available right in the town centre in front of the Harbour Hostel. I stayed at Hotel Franciskus, which was a very nice place, reasonably priced.
Photography tips: Stykkisholmur has some really cool nordic-looking houses, if that’s something you like to photograph. The lighthouse looks good on photographs from the harbour (with the huge basalt cliff) as well as from the island itself once you climb up.
DAY 4 – Driving South, Vestmannaeyjar Views and Seljalandsfoss
- I found the idea cool – on day 4, head up to the south! This time, all nice and relaxed, I left Stykkisholmur at 9 after a delicious breakfast. It takes about 3.5 hours (drive only) if you take the tunnel under the Hvalfjördur fjord. I prefer going around the fjord as it is a bit more relaxed. Next stop – the magical Seljalandfoss.
- Lava Centre in Hvolsvöllur – exhibition, restaurant, souvenirs; quite a pleasant stop towards the end of the long drive
- Nice Hostel Seljaland – despite hating hostels from the bottom of my heart, this hostel was actually quite a nice place to stay for one night. The staff is very friendly and you can have a soup or pizza for dinner. The super short distance to Seljalandsfoss is a big plus.
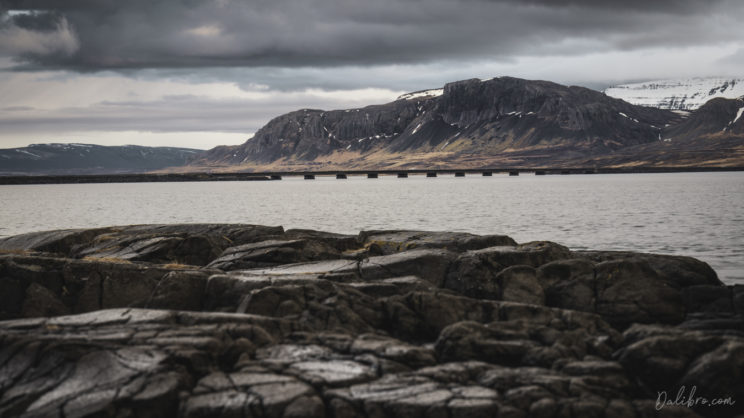
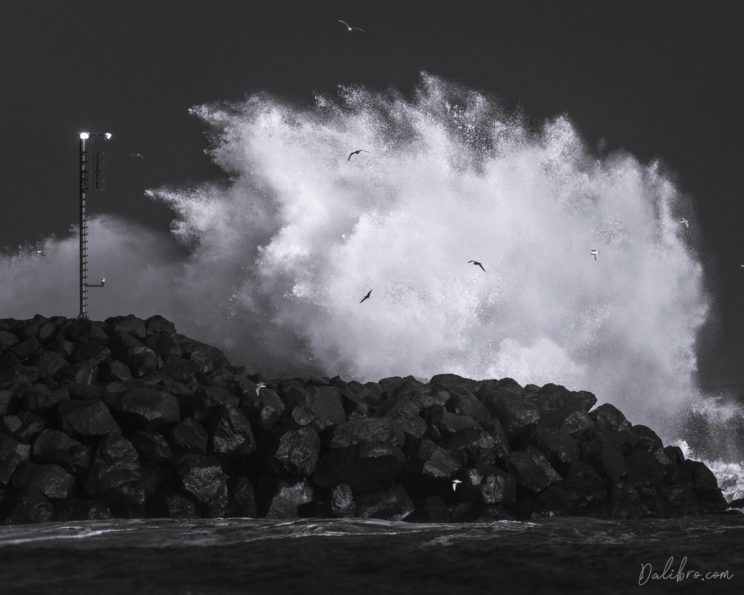
Photography tips: Drive down the road No. 254 leading to the coast. There is parking available around the middle of the way where you can watch the mountains behind you and spectacular views of Vestmannaeyjar. After that, keep driving! You’ll get to the shore, where the views might get even more spectacular. And if you’re lucky, you may see some really big waves. Have your long lens ready. And your cleaning set!
- Try to visit Seljalandsfoss and Gljufrabui as late as possible as it is one of the most crowded places in Iceland. The parking nowadays costs 700 ISK and is valid for 24 hours. If your budget is really tight, you may park directly at the information point, right behind the junction and walk about 200 meters. But honestly, with the amount of people arriving every day, I understand they need some income to keep the place running.
Photography tips: Both waterfalls are so stunningly beautiful but if I’m honest, such a pain to photograph! The spray of water is so intense that it will spoil your photo the moment you take off the lens cap. And then again. And again. If you want to try anyway, weather-sealed equipment is definitely a good idea. Cleaning set too. Gljufrabui is even more hardcore than Seljalandsfoss. You must literally enter a cave in order to see it. Walk a couple of meters through a stream (not deep but waterproof shoes help a lot) and there it is. You might need 2 exposures – one for details of the cave which is really dark and one for the waterfall itself.
DAY 5 – Solheimasandur plane wreck, Dyrholaey and Skogafoss
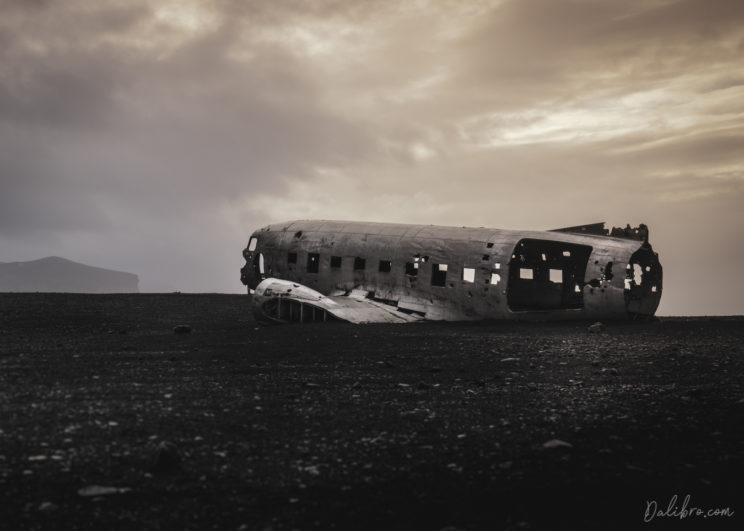
- Getting up very early again and driving ca 30 minutes from Nice Hostel Seljaland to the Solheimasandur plane wreck, highlight of the day. I deliberately passed Skogafoss, hard decision to make but the light is in my opinion better during sunset there.
- Solheimasandur plane wreck- I devoted an entire post on this one. Short summary – for photography purposes, it is a small paradise! Especially if you have the chance to be there alone or almost alone. If someone brought me there in the middle of the day and told me I had to walk through Mars-like landscape for about 40 minutes one-way in order to see what essentially is an old piece of junk covered by tourists…no, thank you very much. Breeeaaaathe.
- Dyrholaey – after the exhausting hike to the plane wreck, it is really nice to have some warm drinks in the car and maybe a breakfast. You might be thankful for warm dry clothes too. Then, you’d have 2 options – going back to Skogafoss or continue to the legendary Dyrholaey and Reynisfjara. Dyrholaey comes first and offers great views of what’s about to come in Reynisfjara. When you arrive at Dyrholaey, follow the better-looking road to the main parking. After you walk around the parking area, don’t miss the hike up to the lighthouse. It leads around cliffs where you might spot puffins in summer. Once you get up, you’ll get some spectacular views of the area.
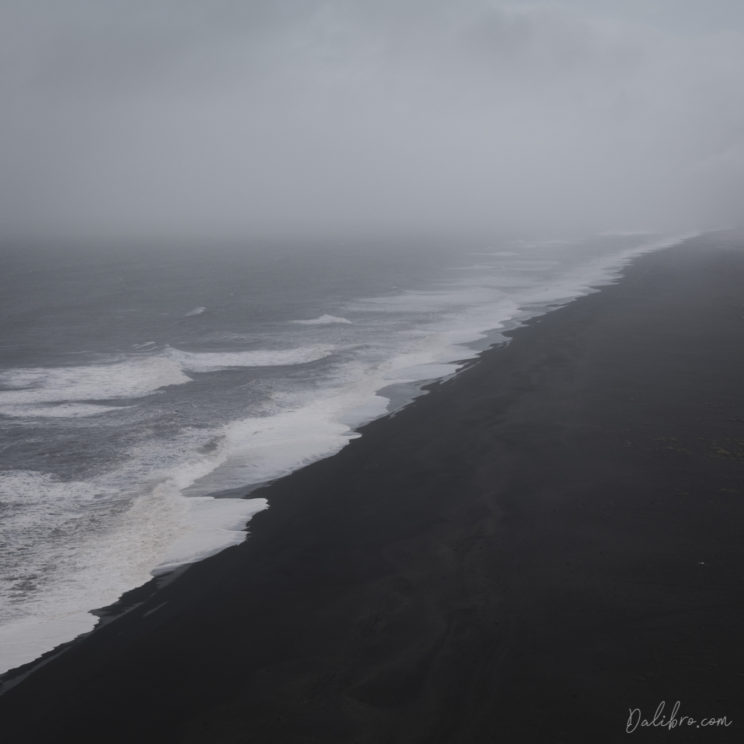
Photography tips: I personally loved the view from the Dyrholaey Lighthouse – you can see the massive black sand beach which goes in a straight line up to the Solheimasandur plane wreck. On a windy day, the coastline disappears in the emptiness of the ocean spray. A sturdier tripod might be handy, as it can get very windy there. And finally – if you travel in summer, bring the longest lens you have for the puffins! Dyrholaey is one of the few places on Iceland where you can watch them on the coast (the other one is Latrabjarg in Westfjords).
- Reynisfjara – the place you don’t want to miss is on the other side of the Reynisfjara beach. The basalt cliffs look almost like made by men. Reynisdrangar, the rock formation in the sea, is another famous photo spot.
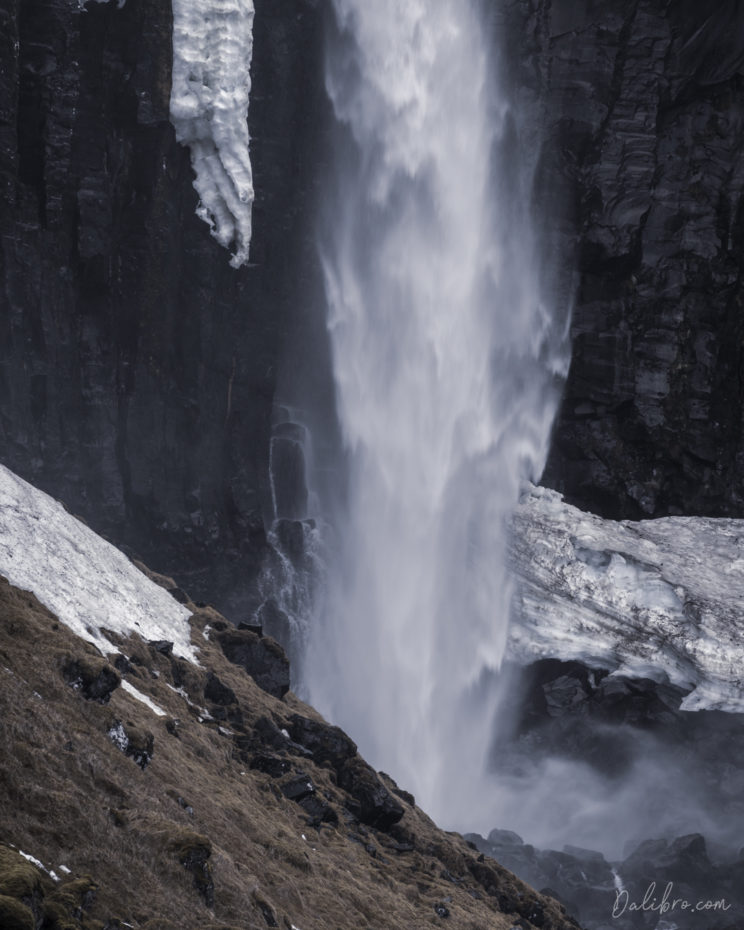
- Skogafoss – going back direction Reykjavik, you’ll pass Skogafoss again. To me, it looks like the definition of a waterfall – very high, very wide, very powerful. Not to be missed!
Photography tips: Check out the wind! If the wind comes from the sea, it blows all the spray from the Skogafoss waterfall away from you as a photographer. Which means you can get really close with barely any drops on your lens! You may struggle with a large number of people in your shots. One solution is a long exposure, for which you’ll need a tripod and an ND-Filter. The second solution is walking up closer to the waterfall and then slightly to the right towards the tip of the rock. I observed the spot for quite some time and it seemed much emptier as most of the people approach the waterfall frontally, take a picture and leave. The reasonably wide lens is a good idea.
- Drive to Eyrarbakki – this is optional. I wanted to see part of South Iceland which is not very known and Eyrarbakki looked like the perfect starting point. I stayed at Bakki Hostel Eyrarbakki. Another good affordable place.
DAY 6 – Strandarkirkja, Krýsuvik and Lake Kleifarvatn
- Strandarkirkja – if you enjoy churches, this is another pretty one. It is close to the beach and has a couple of elf-houses at the graveyard. There is an entrance gate but it is not locked. You’re allowed to enter, just keep the gate closed.
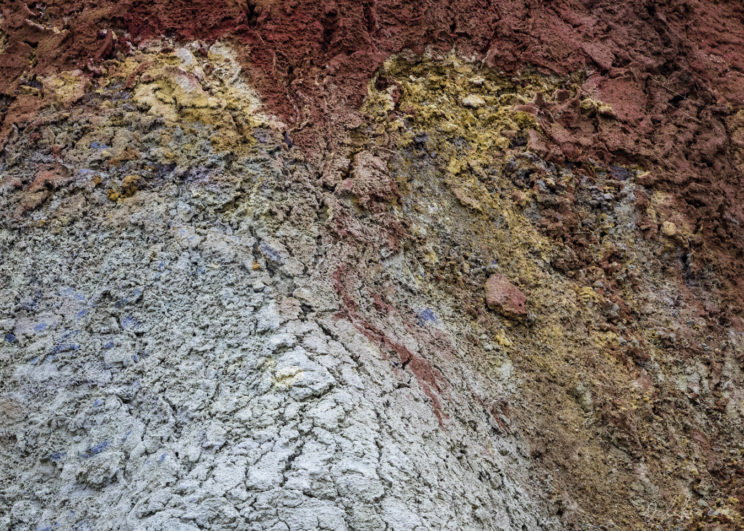
- Krýsuvik – this was my highlight of the day, there is a small boiling mud pot area called Krysuvik Seltun, which is relatively calm (the bus tours usually don’t plan to spend much time there) and actually very pretty. It is not at all of the size or awesomeness of Hverir but hey, if you don’t have time to drive there, this is a good place to visit! There are only sone quite small boiling mud pots but lots of steam, colors and luxurious sulfur smell everywhere!
- Kleifarvatn – a pretty lake and my last stop in Iceland. This lake definitely has photography potential as you can see on this stunning photo. I wasn’t that lucky though. One more note – I somewhat struggled with finding parking in the entire area, so be careful when looking for one.
- Keflavik Airport – boring stuff – petrol station, car return and so on. Say goodbye to the puffin! At least to the fake ones 🙂


Very well written.. Iceland is a true gem… Was here a year back and fell in love with it and its a paradise for photography lovers…
Oh yes it really is! Thank you for stopping by 🙂
Yeah so true. It is actually hard to stop photgraphing when you are there!
Great articel and photographes btw 🙂
Agree! Thank you so much! 🙂
There is some great tips and beautiful photos. You truly captured Iceland in a way I havent seen before. Really good blog. I am going to use these tips for my trip to Iceland next year. Thank you.
Thank you for your nice comment! I hope you’ll have as much fun in Iceland as I had 🙂
All your pictures look stunning! I’m loving all the photography tips and this was so interesting to read 🙂
Thank you so much!!!
Iceland captured beautifully in the lens. Especially loved the photography tips. Its one of the destinations on the bucket list and this will be a guiding post to plan and explore. Thanks for sharing the suggestions on the time to go and other relevant details. They are helpful!
Thanks for stopping by and your nice words! 🙂
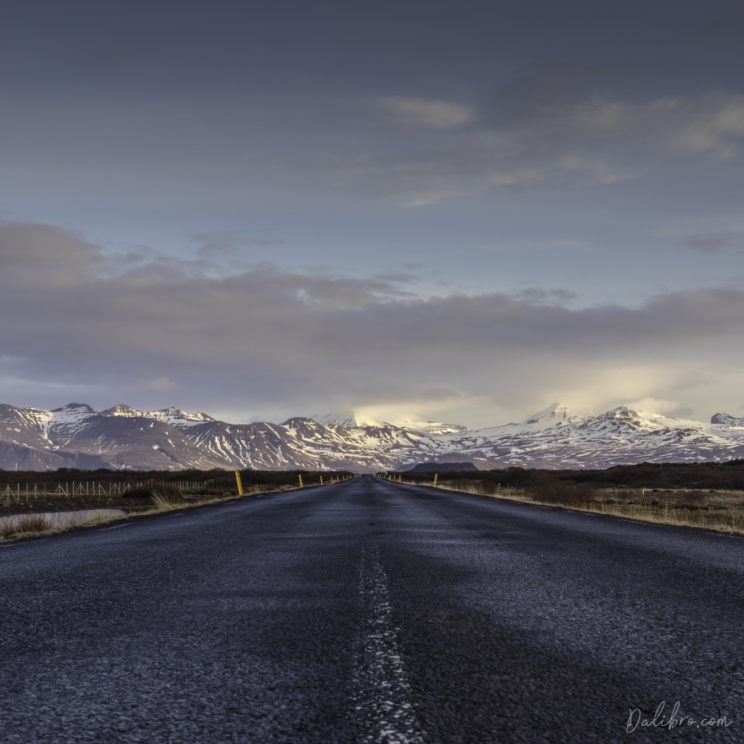
Good god that “road to the mountains” photo was an epic one! Well, I’ll be honest, Iceland looks epic, period. I’m glad to hear that they take credit cards everywhere! I found the same to be true in New Zealand and that made our trips there so much easier because I didn’t have to fork over a ton of fees at the ATM. I love your map of the road trip you took. Good to know that you can do it in a 2×4 as I hear car rentals are expensive there. Were you driving a manual or an automatic? Thanks for the info!
Thank you for your comment! Yeah, the card acceptance saves so much trouble (but also makes you spend more haha). I had a manual gearbox but I’m used to it. There is a very good offer of automatic as well (lots of US tourists doing a stopover in Iceland). 🙂
Some absolutely stunning photographs, and such a comprehensive itinerary! Thanks so much for sharing! I went to Iceland in January last year and fell in love with it (I think everyone does!), would love to go back and try some more photography there.
Thanks for stopping by and your nice words! That’s exactly what happened to me – this was my second time there and I only focused on photography 🙂
This is a super comprehensive guide! Love the way you’ve set it out and included photography tips – it’s very helpful 🙂
Thank you Annie!
Breathtaking pictures.. I have been there last year.. such a heaven on earth..
Always had dream to go Iceland.. your blog is very informative it will help me alot
very creative .. keep it up .. All the best
https://ekpyalichai.wordpress.com/
check my blog as well
I really enjoyed reading this, it was so informative and detailed – and the photos are great too. Iceland is definitely next on my list of places to visit so I have pinned your blog post so I can find it later. Thanks for writing and sharing it 🙂
Hello Ali, thanks a lot for visiting, I’m happy you enjoyed it! 🙂
This looks like it would be an awesome roadtrip! I’ve been to Iceland twice but didn’t explore much further than Reykjavik and the Golden Circle. This is some great inspiration for our next trip.
Thanks for stopping by and your comment! Well, the Golden Circle is a must do, especially if you don’t have much time. But there is simply so much to see and do in Iceland 🙂
Thanks for such a detailed itinerary full of great information. You pictures are beautiful, the Grundarfoss waterfall in particular!
Hello Katie, thank you so much! I’m glad you find it useful 🙂
This is exactly what I needed I find!! Going to Iceland in three weeks and this is our exact road trip route!! I am so excited to be able to go on that adventure and you now sharing your tips!!! Shared to this so I know exactly where it is!’n
Hello Tif, thank you for your comment! I’m superexcited I could help!! I’m sure you’ll love it! 🙂
There’re so many beautiful landscapes in West Iceland. Doing a photo tour is such a good idea! I also appreciate your detailed itinerary!
Thank you Linh! I’m glad you like it 🙂
Iceland is an amazing landscape, your pictures really capture the isolation and I would love to try your suggested itinerary.
Thank you so much! 🙂
This is magnificent and definitely helpful! My bf is a travel photographer and we are currently on a world tour for the most amazing landscapes. You can check out travelimagez .com for our timelapse, drone movies etc. We are currently in thailand and would love to go to iceland after our south east asia and nepal tour. Im saving this blog for future reference.
Really cool! 🙂 Iceland is a fantastic spot for photographers, I could stay there for years!
Hi! I loved your Blog. You have amazing photos and wonderful places that I want to visit
Hello, thank you so much! 🙂 I’m doing what I can 😀