
Why do my images look so blurry?
How do I take sharper photos?
Ever asked yourself these questions? I have. And I still do! Getting my own images sharp is and always will be a challenge. It is a neverending, almost Sisyphus-like struggle between a man and his tool. Sharpness in your photography is one of the factors that will decide whether it’s going to be a hero or zero. Dramatic enough? Now, let’s get cracking and see what you can do to increase the sharpness of your images!
*Disclosure: This article contains affiliate links. If you use these links to purchase any item, I will get a small percentage which helps support my work at no extra cost for you. Any recommendations on this website represent my honest opinion.
But before we start, you might want to check out my article about the holy trinity of photography – this 10-minute read will give you the technical basics and explain the elementary terms used in this post.
But first – it’s freebie time!
Thanks for reading my post! Did you know you can get even more here? 🙂
Join my newsletter and I will send you not only 30-pages of my ebook to help you improve your next trip’s photos but also a free printable cheat sheet to help you keep your photos pin-sharp!
Table of Contents
1. Freeze the time
Although it would be nice, I don’t mean ‘freezing time’ literally. If you’ve read the article I mentioned above, you’ll know that any modern camera allows you to change the speed of its shutter. The shorter the time is, the more frozen the action in front of the camera will seem. And the sharper photo you will take.
Example: When shooting an image of a sleeping turtle, something like 1/100 of a second could easily do (depending on used focal length). However, you’ll have to make the shutter speed much faster for a running animal. Probably around 1/1000 of a second.

Now, this sounds pretty easy, right? Why not crank up the shutter speed to 1/5000 of a second and stick to it all the time? Well, you would notice very soon that it is not that simple. Very short times let only a tiny fraction of light onto the sensor in your camera. So your photos would become really sharp but also…really black. Every time you make the shutter speed faster, you’ll need to adjust the aperture and/or ISO.
On the other hand – avoid using a shutter speed that is too low. The golden rule of handheld shutter speed is: The longest time you may use without a tripod is as many x-th of a second as your used focal length (or “zoom”, if you like). So when shooting focal length 100mm, the absolute minimum for your handheld shutter speed should be 1/100 of a second. Amen.
2. Higher f-number = lower risk of blurred photos
Another technical term – aperture. Aperture defines the depth of field in your image. Translation: If you use higher f-number (smaller aperture), your photos will be sharper. Or more precisely – the risk of focusing on the wrong part of your subject is significantly smaller. Don’t go too crazy though – with an aperture smaller than f13 (f16 etc.), sharpness goes generally down again (depends on the lens and manufacturer). For landscapes, I usually use f9 – f11 to achieve best results.
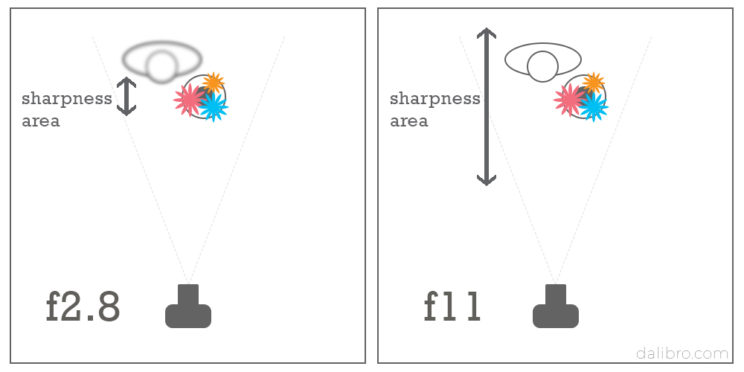
Example: Imagine you want to take a photo of the scene below. There is a person standing just a tiny bit behind a bunch of flowers. The left situation shows what can happen when shooting with a large aperture of f2.8 – the sharpness area (depth of field) is very shallow. That means you risk focusing imprecisely, in this case on the flowers, while the person will remain slightly out of focus and therefore blurred.
The right image represents using a small aperture of f11 which gives you much more “tolerance” – the entire photo will be sharper.
3. Use some kind of support
Sounds obvious, doesn’t it? What doesn’t shake, stays sharp. And trust me – your hands do shake. Getting yourself a nice sturdy tripod (please avoid those plastic no-name cheapos…) will upgrade your photography to a whole new level. But there are also other alternatives. Ever heard of a monopod? It’s a light version of a tripod, well, literally a stick, not unsimilar to a trekking pole. But it provides good support, e.g. to wildlife photographers or you can use it in places where you’re not allowed to photograph on a tripod. Or maybe if you’re shooting things like concerts or theatre, these things are pretty useful and very mobile.
Another option for stabilizing your camera is simply using whatever you have at your disposal – a tree stump, rock, table, bench, your own bag, pretty much anything you can put your camera on! And last but not least – your own body. Spread your feet stiffen your whole body, put your elbows together and rest them on the chest while holding your camera in both hands. If there is a wall or tree around, use it to get even more stability.
4. Shoot remotely / use a timer to take sharper photos
Pressing the shutter gives your camera an unwanted shake. Fact. Luckily, there are ways to avoid that! Now, every camera has a 10s timer and many cameras have also one shorter timer (2s). If you have it placed on a tripod (or on a bench, table, stump, etc.), what you want to do is use it! Two seconds is usually enough to stop the camera shaking. Sometimes I use it even for handheld photography as it gives me time to brace myself. Depends on the subject of course.
One thing is a bit annoying about timers – the waiting. There is always a bit of time lag between you pressing the shutter and the actual time of the image. And in this short time, a lot can happen in your composition. To synchronize these two moments, you may get yourself a cheap piece of equipment that will help you on your way to taking sharper photos – a remote control.
I use an infrared remote control (simply because it’s soooo tiny), which is great but not 100% reliable since you always have to aim well. For about the same price, you can also get a cable one. Former or latter, it is a good idea to own one. Check out some further good-to-have gear here.
5. Try focusing manually
This one might sound counterintuitive if you never used manual focus (MF) before. Nevertheless, you should definitely give it a try, especially if you’re shooting on a tripod. How to focus manually and still end up with sharp photos, you ask? This will depend on the manufacturer of your camera but I’ll try to generalize the Canon wording a bit.
First of all, there is usually an AF/MF switch on your lens that shows you if you’re shooting in manual focus mode or in autofocus mode. Switch it to MF. Then, with your camera on a tripod and your composition ready, switch on the live preview so that you can see on the screen what you’re actually shooting. And now magnify what’s on the display with the “zoom in” button on the camera body.
If you’re a Canon user, you’ll be able to magnify 5x and 10x. Use the navigation arrows to move around the composition and find a spot you want to have focused on. Ideally something with high contrast which makes it easier to see what you’re doing. And finally, turn the focus ring on your lens until your live preview is crisp sharp. Then take the image – use the timer or remote control for the best results.
6. Remove unnecessary filters
Now, I assume that not sooooo many people out there use lens filters but anyway. The level to which filters negatively impact the quality of your final photograph is the topic of many heated nerdy discussions.
I love filters, especially polarizer and ND filters because they add something special which you cannot add later on the computer. However, I’m pretty certain that stacking more than 2 filters on top of each other will reduce not only sharpness but also the general quality of your image. I’m talking especially about cheap filters – you know those crazy sets of 50 for 20 bucks. Don’t buy them. Just don’t.
I usually try to keep things simple and have only one single filter attached on the lens (usually the polarizer or a good UV filter). A UV filter is generally a good idea if you want to protect an expensive lens from yourself (scratches, cleaning accidents, etc.).
7. Switch on the image stabilizer on your lens
Or switch it off. Confused? If your lens has an image stabilization button (IS), make sure you engage it when shooting handheld. That will smoothen nicely any shakes caused by wobbly hands. However, should you shoot on a tripod, don’t forget to switch the image stabilization off! The thing is, the camera doesn’t stop stabilizing even when it’s sitting happily and stable on the tripod. It will still try to compensate for the tiniest movements – which creates more movement. So be aware that IS on can become counterproductive!

8. Check the sharpness already in the camera
If you have the chance to repeat your shot (typically for landscapes), check the sharpness directly in your camera on location. Simply press the image preview button and zoom all the way in to see the result. If you’re not happy, adjust the focus and voilá!
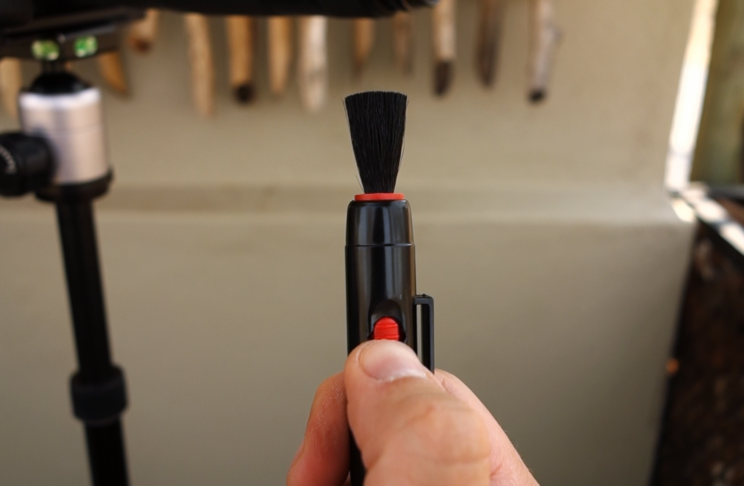
9. To take sharper photos, keep your lens clean!
I almost forgot this point – keep your lens clean and you will be rewarded by sharper photos! Dust particles, raindrops and worst of all – fingerprints not only reduce the overall image quality but they give the camera a hard time when you’re shooting in the autofocus mode (AF). Let’s say there is a raindrop on the lens glass.
Now, if you have AF on, your camera may struggle with what you want to focus on and it might want to focus on that raindrop really badly, making everything blurry. And sometimes it doesn’t focus at all.
Photography cleaning equipment is very cheap compared to the rest of your camera bag’s insides.
10. Sharpen your photo in post-production
Yes, there is a sharpening option in post-production software, namely Lightroom. It is a great tool but it is a fine-tuning tool. It can introduce quite some noise or even some weird effects, so it really needs to be used wisely.
One thing to remember: Software sharpening does not add detail. You must take sharper photos in the field (e.g. by following the prior 9 tips…just saying :))! What software sharpening does is it finds areas of contrast and exaggerates them. But what’s not sharp in the camera, cannot be fixed!
If you’re still not sure what software sharpening is or does, check out my happy elephant example below.
The detail image A) is “as-shot”, straight out of the camera with no software sharpening used. Image B) is what I would personally go for in this case, rather low to medium sharpening (Lightroom sharpening = 40). More details pop up, the photo is not as soft as in A). However, if you go for option C) which represents software sharpening cranked all the way up, you’ll start noticing the awkward effects I mentioned earlier – the background is not nice and smooth anymore and the sharpening to the max introduces this kind of a weird texture into the photo.

Still not tack sharp?
This set of tips covers the basics. Following them should result in very sharp images. However, if you want to bring the sharpness to another level, make sure to check my 5 advanced tips for sharp photos!

