
The Lower and the Upper Antelope Canyon have gone a long way from a hidden gem to one of the most visited tourist attractions in the U.S. West. Nowadays, these slot canyons are a must-see stop when exploring in the area.
And for a good reason – they represent something so exceptional and other-worldly beautiful. For photographers, they are a real treat. A treat that can be very challenging but still a treat. A bit like Bertie Bott’s Every Flavour Beans. Hence this slot canyon photography guide.
Table of Contents
Disclosure
1. What is a slot canyon?
Slot canyons are very narrow canyons (much deeper than wide), typically formed in the “soft” rock foundation, e.g. sandstone. They are created by water rushing through, often in a violent way, a.k.a. flash floods.
They are quite tricky rare things but one place supplies almost a hundred of them – the area around Page, Arizona. Some of them are accessible for the public but only in the form of guided tours.
There is a huge amount of articles dedicated to Antelope Canyons, so I’ll focus on photography here.
2. Light Conditions
I. Profiles of the slot canyons
In order to get an awesome image, it’s important to understand how the light works in the canyons. It’s not only their depth and structure but especially their profiles that play an important role in photographing them.

Subscribe now and get my free ebook straight into your mailbox!
We visited three slot canyons around Page, AZ – Upper Antelope Canyon, Lower Antelope Canyon and the Secret Canyon, one of the smaller ones.
Check out the approximate profiles of them that I skillfully drew and analyzed:
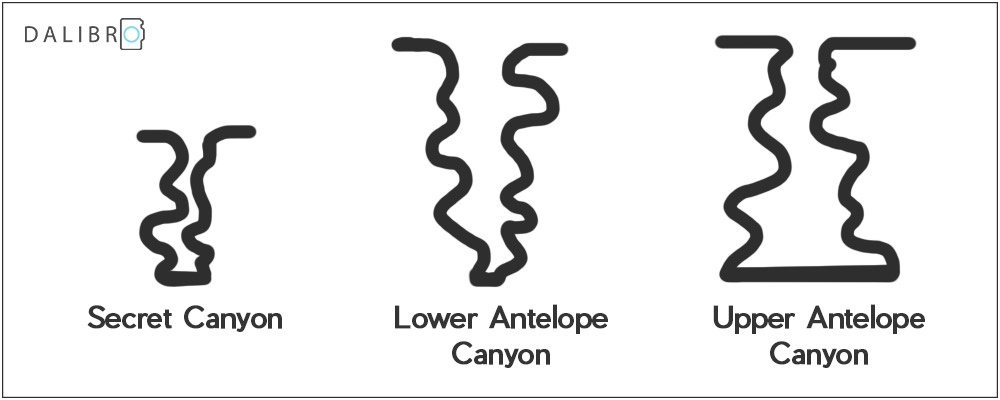
When you look closely and imagine light coming down from above, you’ll realize that each slot canyon is very different.
A. Secret Canyon’s profile (and some other smaller canyons)
In the case of the Secret Canyon, the depth of it is the strongest factor. The light doesn’t have to travel for very long to get to the bottom because it’s not as deep as the other ones. You also get challenging dynamic range situations as the rock can be very bright just a couple of meters above your head while relatively dark at your head’s level.
B. Lower Antelope Canyon’s profile
Now, look at the profile of Lower Antelope Canyon. It is sometimes nicknamed ‘the corkscrew’. The V-shape enables the light to come in comfortably from above and a lot of bouncing off of the walls is involved. That results in nice soft light towards the bottom.
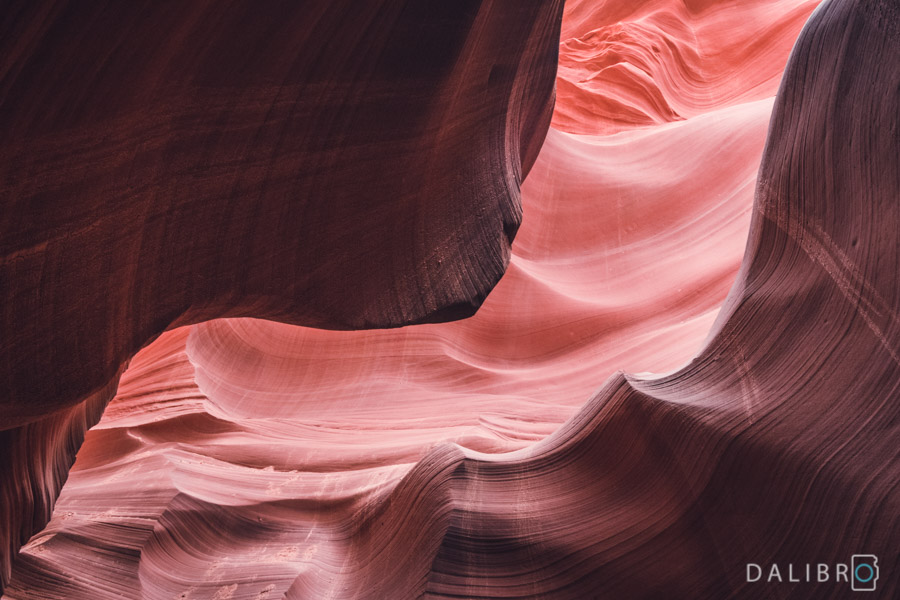
(click here to see this image in my print shop)
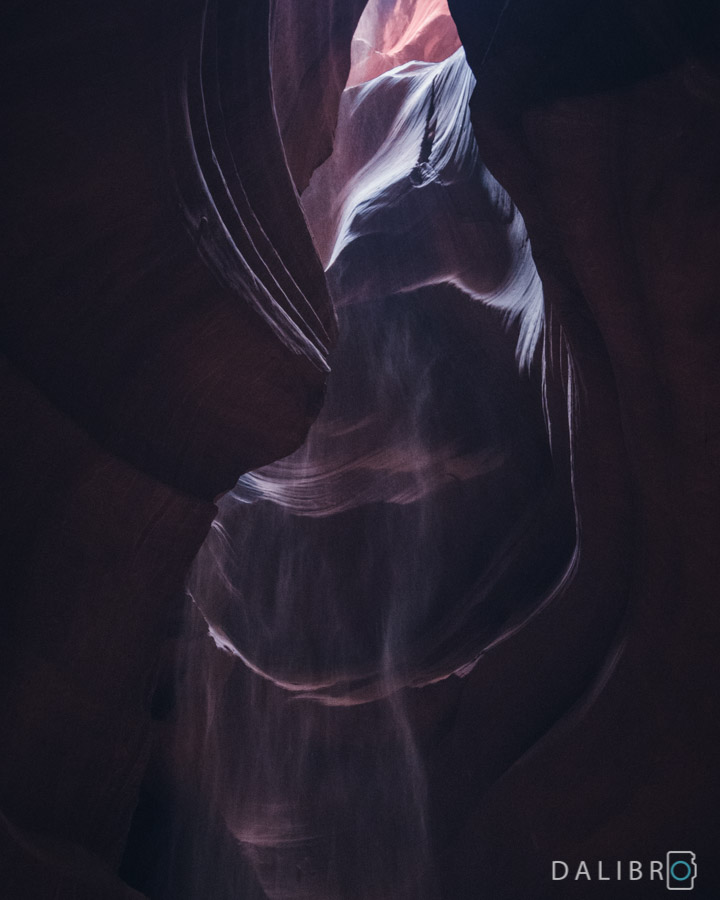
C. Upper Antelope Canyon’s profile
The last one is the Upper Antelope Canyon. It resembles some kind of cathedral – narrow on the top but relatively wide in the bottom. Thanks to the narrow opening, there is not much light getting in, so it’s by far the darkest one of the lot. However, because it is so dark and the top so narrow, Upper Antelope Canyon can offer some beautiful sunbeams.

II. Time of the day and weather
The cool thing about slot canyons is that they’re changing all the time as the sun moves across the sky. So many times, the guides keep saying things like “This sunbeam is gonna disappear in a minute…” or “If you came in the morning, you’d see…”.
“Any time is the best time to visit a slot canyon. You’ll have an amazing experience!”
My opinion is that any time is the best time for visiting a slot canyon. You’ll have an amazing experience! However, if you’re really keen on sunbeams in the Upper Antelope Canyon, you should be in the canyon between 11 am and 1 pm (ca. April to September).
Weather, of course, has an impact, too. On a sunny day, the off-the-wall-light-bouncing is maximized, as well as the chances of seeing sunbeams. On the downside, the dynamic range can be brutal in some parts of the canyons.
We also experienced some overcast moments, when the light in the slot canyon becomes much softer and creates less contrasty scenes.
3. Visit and Photography Limitations of Antelope Canyons
Alright, now back to reality. I’ve already mentioned that you’ll need to book a tour in order to get to ANY slot canyons in the area. So it’s not exactly cheap, especially when doing multiple tours.
Because these guys are dealing with masses of people, there are also some very strict limitations regarding bags – there is pretty much a no-bag and no-straps policy for the Antelope Canyon. And they mean it – you may not be allowed on the tour if you don’t respect the rules. Or wear high heels. Seriously.
The Lower Antelope Canyon is not great for people with any mobility issues as it involves climbing up (and down) ladders. On the other hand, the Upper Antelope is very easy to walk.
The Secret Canyon is a different story – it is a much more intimate experience and you’re allowed to have bags, straps and even a tripod. The groups are smaller and you’re not just rushed through. Other fellow travellers describe a similar experience with Canyon X, another smaller slot canyon in the area.
Tip for photographers: If you plan to bring a tripod, check your options with the tour operator! As you probably guessed, you’re not allowed to have a tripod with you on a normal tour (with Secret Canyon’s exception). However, you can book a Photography Tour in Upper Antelope Canyon and also in Canyon X.
Creativity tip: The guides in the canyons want you to see some of the coolest shapes. They’ll also help you to find them and sometimes even take the shot for you. While it is great fun for you as a tourist, it’s not great for you as a photographer. Trust your own eyes and instincts, look for shapes that YOU like and compositions that YOU find interesting. In the end, you want to bring home YOUR vision of the Canyons, not someone else’s!
4. Slot Canyons photography tips
The sensation of being in a slot canyon can be very overwhelming. The light conditions in any slot canyon are challenging and there is no universal tip for taking amazing images. Except for one – observe the light around you.
“For photographers, slot canyons are a real treat. A treat that can be very challenging but still a treat. A bit like Bertie Bott’s Every Flavour Beans.”
It is easy to get very excited when you see all the fantastic images on Instagram. It is about the same easy to become quickly discouraged when you’re in the canyon yourself and your camera doesn’t show you the results you wished for.
I will describe a couple of things regarding the gear and settings:
I. What lens?
As the space is very limited, I’d recommend a wide lens. Anything between 10 mm and 24 mm will do. I had only one or two moments in the Upper Antelope when I wished I had a lens a little bit longer than that – 35 mm maybe even 50 mm.
II. Focusing
Unless you’re on a photography tour with a tripod, I recommend using your autofocus (AF). You won’t have time to do precise manual focusing. So trust your camera and lens for once, and invest your precious time into enjoying the place, looking for interesting shapes and composing your images.
Advanced tip: My camera’s autofocus got a bit confused in the darkest parts of the Upper Antelope Canyon. I switched to the single-point autofocus and then always quickly placed this point to the brightest spot of my composition (remember that bright pixels = sharp pixels!). It worked really well!
III. ISO
ISO depends very much on the profile of the canyon as described earlier. If you’re lucky enough to go on a photography tour with a tripod, I’d recommend something between ISO160 and ISO400.
But if you only can shoot handheld, don’t be afraid of using higher ISO, modern cameras can handle more than you may think! In the Secret and Lower Antelope Canyon, I used mostly ISO between 800 and 2.000 for handheld images. The lack of light in Upper Antelope required me to go as far as ISO 10.000.
IV. Shutter speed
Shutter speed depends a lot on your lens. The wider lens you have, the slower shutter speed you can use for handheld images.
For my handheld photos, I aimed for a shutter speed around 1/100 of a second on my 10-18 mm lens. Again – not really possible in the Upper Antelope, where I went as low as 1/50 of a sec.
Advanced Tip: The amount of light will change with every step you do. Use the Tv mode (shutter priority) on your camera and set your shutter to a reasonable speed. Then set your ISO to Automatic. This will result in an almost automatic mode – your camera will decide about ISO and aperture but you will still control the shutter speed. And trust me, a shutter speed which is too slow is the number one reason for blurred photos!!!
V. Aperture
In “normal” landscape photography conditions, I tend to use the aperture of f8.0 to f11. Nevertheless, if you cannot use a tripod, you might want to open your lens as far as it goes.
If you do use high apertures (low “f-number”), only bear in mind to compose carefully in order to avoid unwanted blur in background or foreground.
VI. White Balance
Here’s the juicy one. White balance is basically responsible for the warmth level of your image. The tour guides will probably recommend using the “Cloudy” setting, which is rather warm (ca. 6000 K) and will make your image nicely orange.
However, don’t be afraid of experimenting! I personally often like my images a bit “colder” so I explored also tungsten light area around 3300 K. White balance setting is non-destructive if you shoot in RAW format and you can comfortably change it later. So please, shoot in RAW. At least in a slot canyon!
VII. RAW vs JPEG
1000% RAW! Normally, I wouldn’t be this enthusiastic about RAW, as I’m a strong believer that you can create amazing images with JPEGs, too. But in a slot canyon, you can really use all the advantages of RAW to the fullest.
RAW gives you the possibility to experiment with the white balance, exposure and contrast in such a way that JPEG simply cannot offer.
Learn more about RAW and JPEG format in this supernerdy blog post.

VIII. Keep an eye on your histogram
Due to the extreme dynamic range in the Slot Canyons, you’ll get a histogram like this more then you’d like:
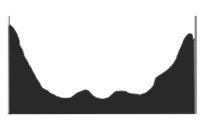
So you’ll have to work constantly on your composition and settings in order to avoid overblowing the whites and destroying all the details in the shadows.
5. Slot Canyons – Creative Editing Ideas
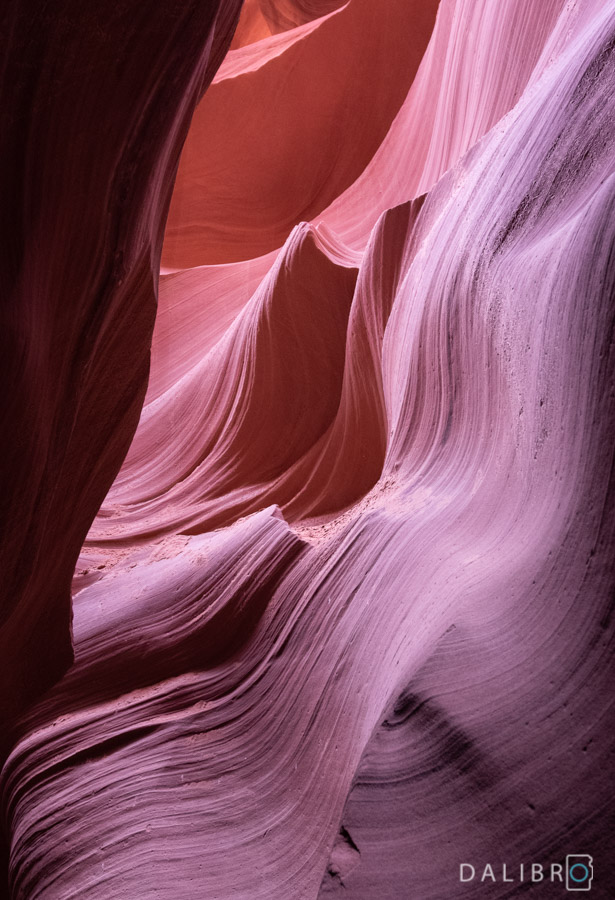
OK, let’s be open and clear about this right from the start – Antelope Canyons are NOT deep purple! Even though you can really see some subtle magenta tones in the canyon’s shadows. But they are far from the saturation you’re exposed to all over the internet.
However, I do respect the photographer’s wish to create something different. Something even more abstract than the Canyon itself. Which alone, is already very abstract. If you shoot in RAW, your options will be endless. So why not try some of them and experiment? Let’s call this a disclaimer.
Here are some of my processing ideas:
I. The Natural Look Edit
There is very little that you must do to bring your photograph to life but remain as realistic as possible. No universal way of processing exists but let me show you how I’d personally work on a natural look.
First of all, I would go down with the temperature, something around 4500 K works usually well and brings back the soft natural look of the sandstone. Then I’d increase the contrast just a touch, somewhere between +5 and +15). This could be already enough!
You may continue editing though. The rest, however, depends on the scene and on your preference. Decreasing the highlights and bringing up the shadows will be often necessary for your slot canyon photos. Sometimes you’ll need to increase the saturation, vibrance or clarity. But quite often you’ll have to go down with them or leave them as they are.
Important is to stay subtle and keep comparing the original with your edit.
II. The Magenta Edit
This is the one which is currently very popular. And if you don’t go too crazy about enhancing the purple tones, this kind of edit will actually look cool. I used it for a couple of images where I wanted to emphasize the feeling of unreal pastel colours of the scene:
The actual execution is in fact really simple. All you need to do is increase the vibrance, decrease temperature (white balance) and add a bit of tint. For an even more subtle effect, reduce saturation.
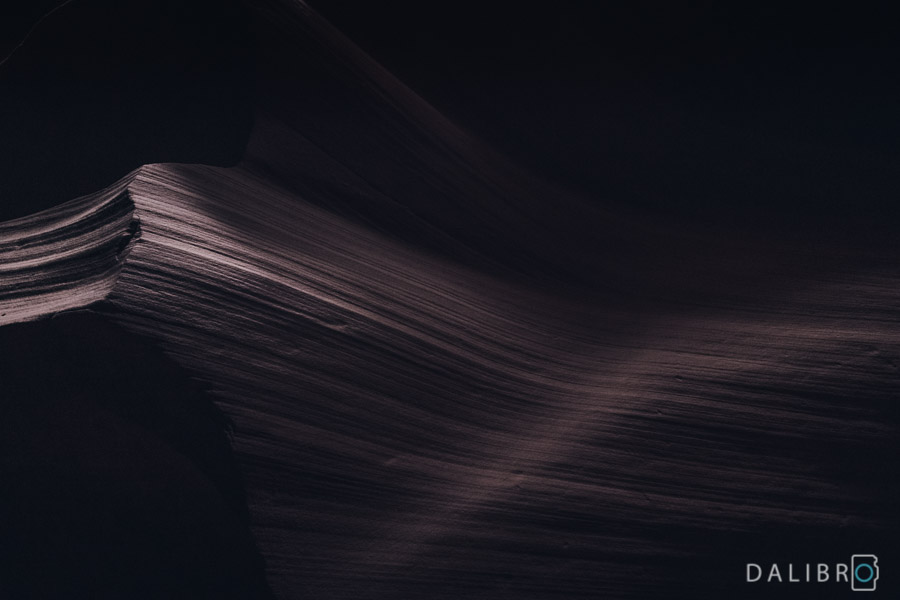
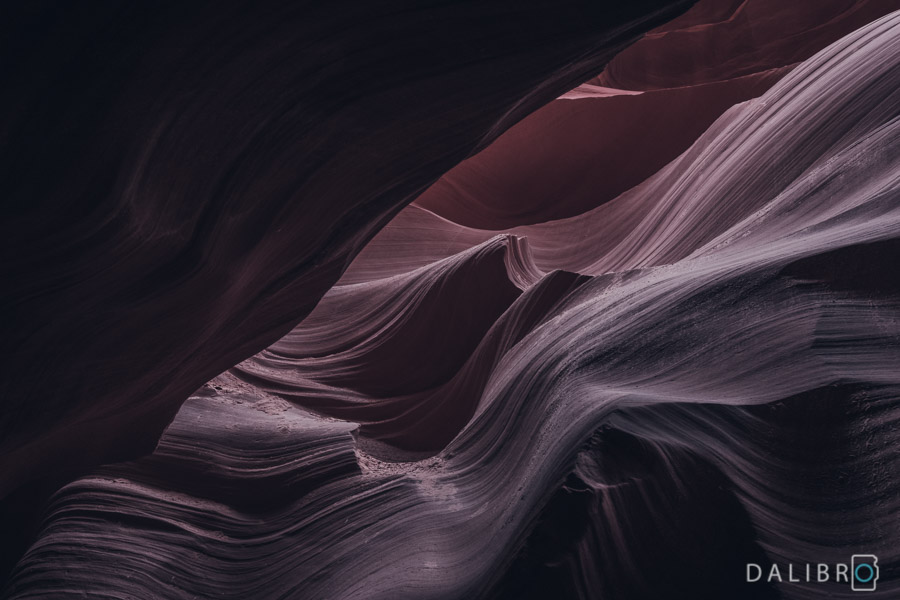
III. Semi-Dark Edit
The slot canyons are often dark yet you can still see the colorful shapes everywhere despite the lack of light.
To recreate this sensation, I used my own preset “American night” as a starting point of my edit. It is quite an elaborate preset but what it does is essentially decreasing the overall exposure, removing whites and highlights, and at the same time increasing the luminance of certain colors. Plus numerous further tweaks. In a nutshell.
IV. Dark and Cold Edit
This is again an advanced kind of edit. It requires you going nuts first to process an image from a slot canyon this way. Then you can apply my preset “American Night” and start playing around.
This image is significantly darker than the one above. The reason is not only the different tweaks I did after applying the preset but also lighting and colour in the original scene.


Do you have any other visiting or photography tips? Let me know, I’d love to hear from you!
Pin this for later:


Thank you !!! This site along with your “holy trinity” refresher was very helpful as I set out for my first trip to the Zion area.
As you discussed the slot tips, I didn’t see any mention of filters. Especially since it sounds like no matter where you go you will experience dynamic range.
Thanks for reading, Frank! You are right, gradient filters could actually really be helpful for some compositions! The only drawback would be the logistic, as you’re more or less pushed through the canyons (maybe except for smaller ones). So not much time to set up things 🙂
“Shutter speed depends a lot on your lens. The wider lens you have, the slower shutter speed you can use for handheld images.”
I’m going to Antelope next week so your site was helpful. In the quote above you meant to say “faster” shutter speed. Just trying to help, not trying to be a troll. 🙂
Thank you for the useful information. I will be at the upper and lower Antelope Canyon from 1-8 July 2022. I am trying to get all of the useful information that I can. I called the tour company today (26 Jan 22) and I was informed that they don’t allow tripods in the canyon anymore and with that being said only hand held is allowable. I also enjoyed your images. Once again thank you.
Hi Noel, thank you for that update! Enjoy your trip!