
So you tried out all the basic techniques for taking really sharp photos but you’re still not satisfied with the results? Or maybe just curious if there is more?
Well, then buckle up and get ready for even more sharpness tips and tricks that will help you get the perfect image on your next trip! This is Sharpness 2.0, baby!

Disclosure
Table of Contents
1. Switching to the Single Point Auto Focus to keep your photos sharp
The juiciest technique right at the start! As a landscape photographer, I’m usually wandering around using the Manual Focus (MF). But let’s be honest – focusing manually is not very practical for everyday photography.
Auto Focus (AF) is awesome, and every new camera model improves it even more. However, a camera is still just a tool, and it doesn’t always recognize what you actually want to shoot. And that results in unsharp photos.

Subscribe now and get my free ebook straight into your mailbox!
Look at the example below. I took a photograph of this jay using almost exactly the same settings and in AF. But one thing was different. The left image was shot using the camera’s automatic selection of focus points (which is btw. phenomenal on my Canon 80D).
But here it simply couldn’t recognize where to focus. Look at all the twigs and branches everywhere! The left photo’s sharpness is a disaster.
For the right photo, I switched to the Single Focus Point and aimed that point at the eye of the bird.

(click on the image to enlarge the preview)
But it’s not only wildlife where this feature makes a great difference. The single point autofocus mode is incredibly useful also for portrait photographers who can aim very precisely at the eyes of their subject.
How to change the focus mode
Switching to Single Point Focus mode is usually not as difficult as it sounds but it’s different depending on your camera’s model and manufacturer.
This is how you can do this on a Canon 80D and similar models:
2. Shutter Priority Mode for handheld shooting
I briefly described this technique in my post about photographing the Antelope Canyon.
The idea is that sometimes you need to shoot handheld (maybe you’re not allowed to use a tripod or you’re doing wildlife photography, etc.), quickly react on changing conditions and let the sharpness of your photos suffer.
In such cases, I usually don’t use the Manual mode but switch to the Tv mode (also called S mode on other camera models).
Tv stands for “time value” and it is a semi-automatic mode.
When you’re in this mode, you define the shutter speed which is sufficient for keeping everything pin sharp. And the camera decides about the aperture it needs for proper exposure.
But one thing is missing in the holy trinity of photography – the ISO. That you can still adjust manually. What I like to do is set the ISO to “Auto” (or “A”). Once you do that, you ONLY decide about the shutter speed.
Example: Let’s say you want to photograph a squirrel. That little man is hopping around through bright and dark areas of a tree. Taking care of the fully manual mode is almost impossible. But by switching into the Tv mode you tell your camera to shoot at e.g. 1/1600 of a second to freeze the squirrel’s movement and the camera shake. Add Auto ISO to the formula and you can only focus on your subject. It’s not difficult!
Pro tip: Your camera may not always decide right regarding your exposure and your squirrel can be under- or over- exposed. By far the fastest way to correct it is using the exposure correction button on your camera which controls the brightness of the exposure. On Canon cameras, you can do that by rotating the main dial.
3. Sacrifice ISO for higher shutter speed and sharper images
This is a tricky one because you’re about to deliberately decrease the overall quality of your photo by increasing ISO and hence the noise. This will allow you to shorten the shutter speed and the camera shake.
However, in difficult light conditions, I’d still rather have a photo with a bit more noise than usual than no photo at all. Or a blurry one because my shutter speed was too slow.
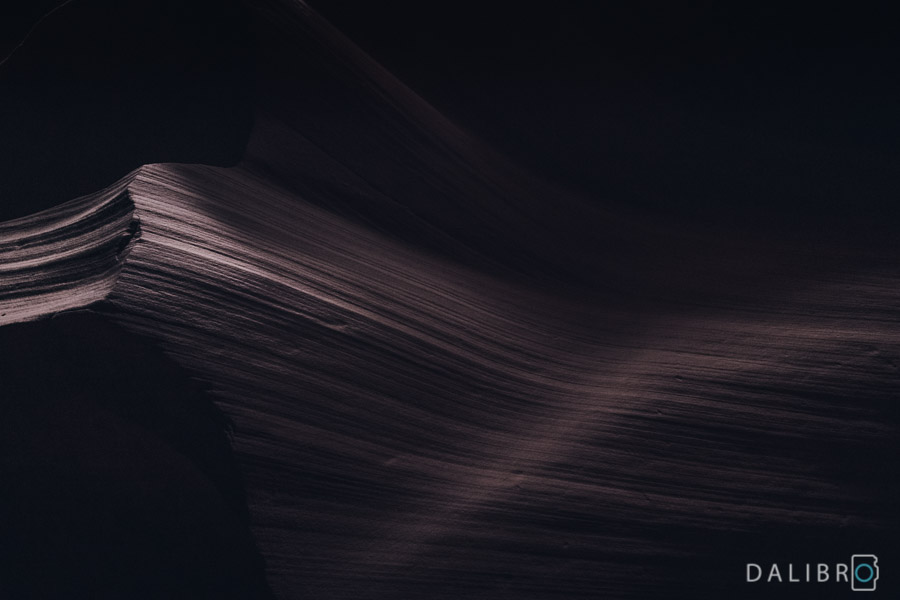
As a landscape photographer, I am not used to ISO higher than 200. But especially when shooting handheld or wildlife you simply need a speedy shutter. The image below was shot handheld in the Upper Antelope Canyon with ISO2500 which is way out of my comfort zone. But it allowed me to get a reasonable shutter speed of 1/50 of a second (on 13 mm focal length). And I’m so happy I have the photo! Just look at the sweet curve and the moody look!
4. Use mirror lockup to reduce the camera shake
Locking up the mirror is one of the rather hardcore methods for real sharpness obsessed freaks like you and me. I mean, those pixels won’t sharpen themselves, right?
The idea behind this method is that even the mechanical movement of the mirror inside your DSLR camera when taking a photo creates an unwanted shake.
The mirror flips up and then down every time you take an image. Listen very carefully next time and count the clicks! 1! 2! Click, click. The mirror lockup function basically separates the “up” from the “down” into two steps, two clicks.
This feature is pretty much dedicated to landscape photographers using a tripod, some kind of remote control and relatively slow shutter speeds (approx. between 1/40 and 1/4 of a second).
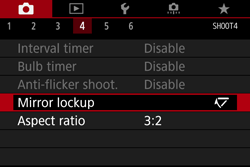
Source: Canon USA
Tip: It gets quite tiring to think about the mirror lockup every time when doing landscape photography. There is a simple alternative – the Live View mode on your camera (you know – the one that activates the LCD screen)! Listen to the click when you press the Live View button. It’s the mirror locking up in position straight away! That reduces the movement when you press the shutter. The effect is almost identical to the mirror lockup.
5. The High Pass Filter in Photoshop to sharpen the edges in your image
The final technique to make your photos extraordinarily sharp is an editing tip. Just like the last time – keep this one for the very end. Editing sharpness should be only a final touch, cherry on the top of the cake.
In my previous article, I talked about using Lightroom sharpening, which is totally enough for most of my photos. However, if you try to push the limits of the Lightroom sharpening tool, you’ll often get that weird effect, even with masking. It looks like trying to sharpen every pixel instead of focusing on the edges.
So when I want to put an image for sale as a print, I use this simple Photoshop technique:
- I. Open your image in Photoshop
- II. Duplicate the base layer
- III. Apply High Pass Filter – low values affect fine details (I usually use something between 1.5 and 3), feel free to experiment!
- IV. Change the blend mode to Overlay – adjust the opacity if you want
- V. Create a Mask – sometimes, it’s a good idea to apply a mask if you don’t want to affect certain areas (typically you do not want to sharpen motion blur or very dark/bright parts of the image)
What I really like about it is how fast and simple it is. The High Pass filter emphasizes the edges in your photo without destroying what’s in between. You can also experiment with the opacity, with masking or even with creating multiple layers with various levels of sharpness (value of the HP filter).
Do you have other tips for increasing the sharpness of your images? Let me know! 🙂
Pin this for later:


I’m going to Antelope Canyon next week and really appreciate this tip: “3. SACRIFICE ISO FOR HIGHER SHUTTER SPEED AND SHARPER IMAGES” – As someone who’s been brainwashed into, “Less noise is always better!!”, what good is a jumpy/blurry image at ISO 200? Thanks, I suspect thanks to you I’ll have a few more keepers. 🙂
Thank you for your comment, Scott, I hope it worked well in the Canyon! I agree with you – the “less-noise-is-always-better” obsession is difficult to overcome!