
Is going to Patagonia on your own really worth it? The short answer is – hell yeah! If you came here just to find that out, you’re now free to leave.
However, planning the trip to the end of the world with my wife turned out to be the biggest challenge so far. Of all times. Ever. Dramatic enough?
I’m quite used to planning, researching, doing spreadsheets, drawing maps, this kind of stuff but this time it really took me ages to draft a plan. Which is what I really need when travelling. A plan. Yes, yes, I would love to be wild and spontaneous but I still prefer to know that my bus leaves at 7:35 and costs me 17.99. So if you’re like me and you’d like to know more, keep reading, some exciting tips and tricks coming on!
This article series will focus not only on what we experienced but also on the planning process of our trip. And some details of how to get from A to B. So maybe I’ll save you some time eventually. Or grey hair. Ready?
Table of Contents

Subscribe now and get my free ebook straight into your mailbox!
What and where is Patagonia
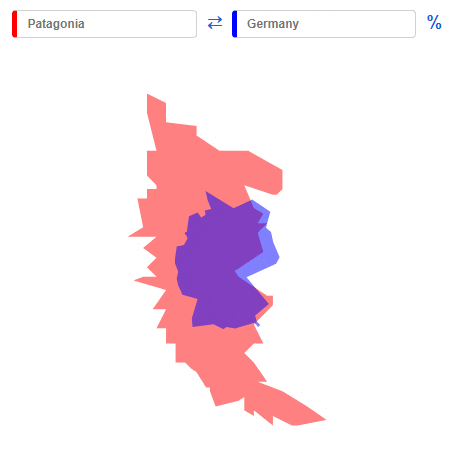
Let’s start from the scratch – Patagonia is a South American region that overlaps two countries, Chile and Argentina, on the south tip of the continent. And it is one hell of a region – with about 1 million square km, it is 3 times as big as Germany. Which is an actual pretty large country with a capital city, government and stuff.
You should definitely take the size into consideration when planning your trip. Don’t feel ashamed to skip certain things or to take a domestic flight between destinations. If you have dedicated common vacation time for Patagonia (like 2-3 weeks), get over the fact that you will not see the whole thing. Instead, focus on one or a few areas you really want to see. Right away. Now. Trust me, doing so will make your stay much more enjoyable.
Our Patagonia trip – don’t get fooled by maps!
As mentioned above, planning is the key and deciding for what you’d like to see is crucial. Things often look easier and places closer on a map than they really are. Just a short illustration – e.g. getting from Punta Arenas to Ushuaia seems to be a stone’s throw away. But hey, there is the strait of Magellan with only 2 crossing points – Punta Arenas or Punta Delgada. Then the roads are mostly unpaved on Tierra del Fuego, so it takes time. And finally, you would need to cross the border – you’d need one entire day to get there…
That is why we focused on the very southern part of Patagonia, mostly Chilean side with “only” 3 parts, which I like to call “Basecamps” – Punta Arenas, Puerto Natales, and El Calafate. I entered as much information as possible into the following map but I’ll also add separate blog posts for each of the base camps.
Disclaimer: there is about a trillion ways of organizing your trip through Patagonia; none is better than the other, so please take this just as an inspiration
Which is better – Chilean or Argentinian side of Patagonia?
Having done the homework, I believe there is no clear answer to this question. In general, you could say that the Argentinian side is mostly in pampa style, while Chile is rather mountainy. But again, it depends very much on what you want to see. E.g. El Chaltén or Perito Moreno Glacier is (for some surprisingly) in Argentina. Torres del Paine (for some surprisingly) in Chile. The island of Tierra del Fuego is split between both countries.
Not only are the distances enormous, crossing the borders between Chile and Argentina will consume quite a lot of your precious holiday time. That’s why I would personally recommend choosing only one country with a maximum of one trip to the neighboring country.
That, of course, depends on the season and on the border-crossing point. In our case, we stayed on the Chilean side most of the time and went to Argentina for a weekend once (end of March = shoulder season). We spent 2 hours at the border on the outward journey and about 1 hour on return.
Arriving to Patagonia
Depending on which country you choose to start with, your first touchdown will probably take place either in Santiago de Chile or in Buenos Aires. We have decided to take the slow way and after 17 hours of flight spent a night at Hotel Diego de Almagro Aeropuerto in Santiago before going further down on the next morning.

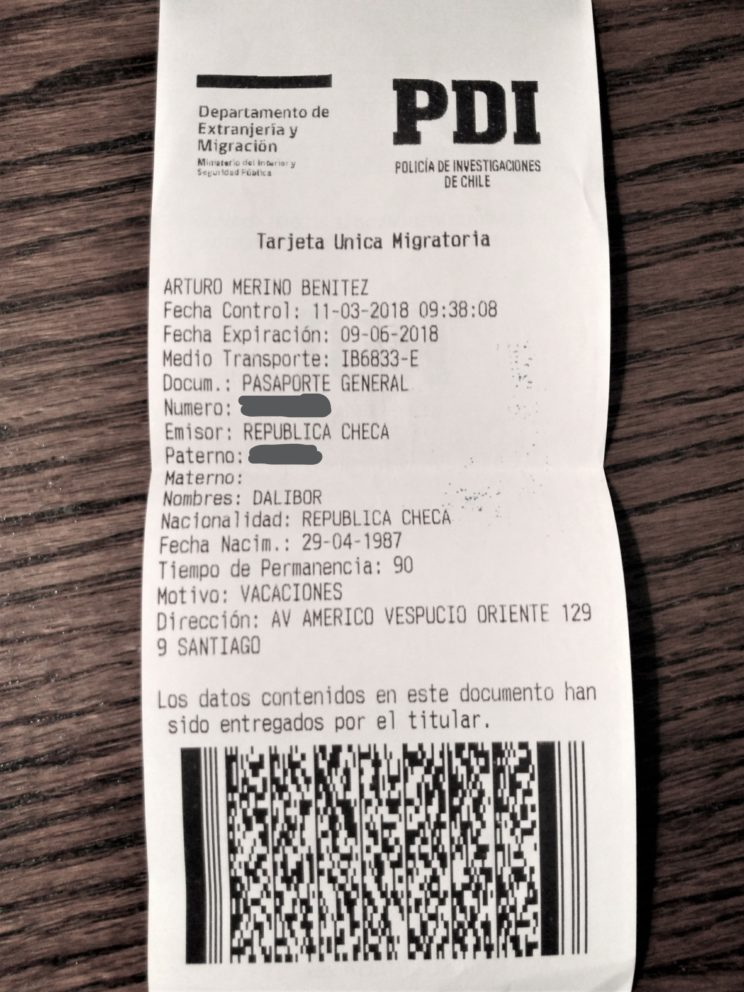
One important thing, if you go for Chile. At your arrival (or still in the plane), you’ll need to fill out a form, stating the usual stuff – your first address in Chile, as well as making sure you don’t bring too much money, electronics or living beavers (especially if you’re a Canadian). All your luggage will also be scanned and theoretically compared to what you wrote.
After that, in exchange for that form, you’ll receive this paper slip. It looks like a grocery receipt but it’s much more important. Store it immediately to a safe place, ideally into your passport bag. You’ll need it every time you check in at a hotel, and also for crossing the borders to Argentina. At the border, you’ll hand it back to the officer and you’ll be given a new one once/if you come back.
How to get around in Patagonia
By air
If you’ve already started planning, you might have noticed there are no direct flight connections between smaller airports across the two countries. Meaning you can’t fly e.g. from Punta Arenas (Chile) to Ushuaia (Argentina). Another good argument for staying in one country for most of your trip.
By train
Just joking, forget trains.
By water
That might be an interesting option for you in Chile. Especially if you enjoy slow travel and don’t need much luxury. On the upside, you’ll see places that are only accessible by boat. There are ferries that go through and around the fjords. For instance, this one goes between Puerto Montt and Puerto Natales.
You may also want to check out this website for other point-to-point ferries. I will talk more about this one in the post dedicated to Punta Arenas and Tierra del Fuego.
By car
If I’m honest, I have mixed feelings about renting a car. On the one hand, you’re mobile and can go wherever you like, no matter how weird the bus schedule is. However, there are some cons…
Firstly, car rentals are very expensive in Chile and even more in Argentina (and I mean it). Secondly, you cannot usually return the car somewhere else. And thirdly, going to Patagonia is for most of you probably no “road trip” but rather a “going-from-A-to-B-and-then-hiking” kind of trip. Sooo you’ll pay loads of money for a car that just stands around. And I don’t even mention that for crossing the borders, you’ll need a special document issued by the rental company (charged extra). Well, now I mentioned it.

By bus
Here’s the winner. By far the cheapest and most comfortable option to go basically anywhere. Used mostly by tourists (locals have their own cars), the quality of the buses is pretty good. Compared to a rental car, you don’t have to worry about police control stations between cities. Also, if you’re crossing borders, the bus driver kind of talks you through the process. Most likely in Spanish but still, you won’t have to struggle alone.
Top tip: check the bus schedules carefully beforehand, so it doesn’t mess up your plans. While between some places, every bus company goes like 5 times per day (e.g. Punta Arenas to Puerto Natales), between others they might go only once or twice a week (e.g. Puerto Natales to El Calafate). Strangely, the weirdest thing is the bus connection between Puerto Natales and Torres del Paine National Park. There are like 4 bus companies going only twice a day. The trouble is they all leave at almost exactly the same time. Read more details about my Puerto Natales and Torres del Paine trip here.
Full booking of a bus journey is not always possible online. Sometimes you’ll need to write emails to make a reservation and then pay & pick up your ticket one day prior to your departure. As far as I know, you will always need a physical ticket printed out. Ticket on your mobile screen does not have to be enough! Take this into your consideration when planning. Which company to use in Patagonia? You’ll almost for sure need more than one. Here is a list of those I used:
-
- Recorrido: This platform was my favourite – register, order tickets, pay, print out, show to the bus driver. Done. (used for Punta Arenas – Puerto Natales and back; the name of the company was Bus-Sur)
- Buses Gomez, Maria Jose, JP and Bus-Sur – these 4 companies run the business between Puerto Natales and Torres del Paine. The only one you can book online is Bus-Sur (it also has a slightly different timetable, offset by ca. 30 minutes compared to the other companies). However, I can highly recommend booking a ticket with your hotel once you’re there (almost all accommodations in Puerto Natales offer this service). It’s comfortable, they check with all companies who still have availabilities and when you’re on a tight and tiring schedule, you don’t need to walk to the bus station (ca. 20-25 minute walk from the center of Puerto Natales).
- Turismo ZaahjReserved tickets via email, payment done via PayPal link. Then we needed to pick up the ticket on the day of our departure in the box office at the bus station in PN (used for Puerto Natales – El Calafate since they were the only ones going on Fridays)
- Cootra: Reserved tickets via email, payment could be done by card or in cash at the box office at the bus station in El Calafate until the day prior to your departure. So ideally, if you arrive in El Calafate by bus, pick it up directly once you arrive and then it’s sorted out (used for El Calafate – Puerto Natales)
- Plataforma10: We used this platform to get a ticket from El Calafate to Perito Moreno Glacier and back (with company called Marga Taqsa). All in Spanish but we manage to do the reservation, pay online by card and ask reception at our hotel to print out the tickets (again, you need them physically). Be sure NOT to book the 6-hour trip which goes to Perito Moreno CITY!
Money in Patagonia
Lots of people want to know if Patagonia is expensive. The answer is no. It’s insanely expensive. And I’ve been to places like Hawaii, Iceland or Finland. Of course, I have visited only a tiny part of Chile and Argentina but I admit I was very surprised. Just name it – trips, entrance fees, rental cars but also grocery and restaurants. One proud exception was the taxi prices, which are very affordable.
As everywhere – the more touristy place, the higher the price tag. So naturally, Torres del Paine will probably be the craziest place, you’ll visit in Patagonia. Or ever. Don’t forget to count that in.
Still, if you don’t mind a bit of discomfort, you can stay in hostels, do some camping, make your own sandwiches etc. It’s all totally doable on a tighter budget if you plan well and in advance. In our case, the most expensive were the activities. But since we really wanted to see penguins, do an expedition on Tierra del Fuego, go kayaking or walk on a massive glacier…you know…you gotta do what you gotta do. 😊
We’ve spent only 3 nights in Argentina but my feeling tells me it is slightly cheaper than Chile.
The question of cash vs. card. I’d say your chances to pay by card are like 50:50. Many hotels, restaurants and travel agencies accept cards (we experienced exceptions for all three of them). Anything that has something to do with transfers (taxi, boat, bus), park entrances, souvenirs etc. tend to be cash-only. Another top tip: bring two different cards. I have experienced troubles with my VISA debit card which normally works well all around the globe – this time, payments didn’t work, withdrawals did. In Chile, I strongly recommend to always check how much cash you still need and withdraw the maximum of 200.000 CLP (= ca. 260 EUR). No ATM would allow us to withdraw more than that. The withdrawal fee with a foreign card was insane – ca. 8.000 CLP (ca. 11 EUR), plus whatever your own bank charges.
How to pack and what to wear in Patagonia
Another important thing for planning your trip is to know what kind of clothes you’ll need to get inside your luggage. By the way luggage. I cannot stress enough how glad we were to bring rucksacks. We also had one small cabin-sized suitcase and it was not exactly the hero of the moment. Conclusion – take one big rucksack for most of your stuff and a smaller backpack (cabin-sized) for the plane and for sub-trips. Because we were on the move so much, we always left the big luggage in the hotel we stayed in (before and after the sub-trip) and took only the small bags with us. Make sure your hotel can store your bags even when you’re actually not staying there! (in our case, everyone was quite used to it).
My personal tip to packing is – pack not only light but leave some space in your large bag! This saved us so much time and nerves since we were packing and repacking pretty much every single day. If you pack very tightly, with no space left even for a souvenir, you’ll regret it in no time!
In terms of clothing, it again depends on where exactly you go and when. Generally, Patagonia is a very (!) windy place. So windy that once we were unable to move and just crouched petrified and pretty scared just a few meters from our van. Expect the strongest winds in summer (high season) and weakest in winter (low or no season). From the temperature point of view, we got everything between 0°C and 18°C, sun, rain, mist, and snow. There were many moments I was very happy about my solid winter jacket. And many moments I wished I had brought something lighter with me, especially during the hikes. Wearing layers is a good strategy.
Good shoes! Chances are, that you will walk a lot, you won’t regret getting good ones. I always recommend LOWA Renegade, seriously the best shoes I’ve ever owned. Also, bring some foam flip flops or sandals, they weigh nothing and make your evenings so much better!
Speaking English in Patagonia
Very often, English won’t get you very far in Patagonia. Even on places where you’d expect that – like airports, hotels, restaurants, even tourist information, travel agencies, etc. But hey, we survived! I don’t speak a word in Spanish, my wife does a bit. Just try to listen, observe and you’ll be fine. A couple of elementary words would be an asset!


I absolutely loved this post! The tips on planning the itinerary are super helpful, especially the advice about the best time to visit and how to navigate the trails. I can’t wait to explore Patagonia! The packing list suggestions were also a lifesaver. Thanks for sharing such valuable insights!
This post is so helpful! I loved the tips on timing my visit to avoid the crowds and appreciate the detailed packing suggestions. I can’t wait to explore Patagonia; it’s been on my bucket list for ages. Thanks for sharing your insights!
Lijepo opisano, …što znači ovo pazite na količinu gotovine u Čileu, kaoi da Visa ne vrijedi uvijek? Dali je dovoljnoi i da li se smije imati cca 2000€ u gotovini kod sebe?
Great tips for planning a trip to Patagonia! I particularly appreciate the advice on packing layers and the reminders about the weather. I never knew about the hidden gems you mentioned for lesser-known trails. Can’t wait to put this knowledge into action for my upcoming trip!